Admin > Site Settings
Maintenance and system setup tasks of KinderConnect are managed in the Admin activity. It is also used to manage the overall appearance and functionality of KinderConnect.
Operators with administrative rights can review the error log as well as edit the site and permission settings.
The field values on the Admin > Site Settings page affect the internal operation of KinderConnect. Some of these values are set during deployment and cannot be changed while others can be modified by the System Administrator. These settings affect the preferences that govern how the system functions. Changes should only be performed with technical assistance from knowledgeable Controltec personnel.
Press Save for changes to Site Settings to be effective immediately. The Recycle button is used only if it is necessary to restart the system immediately. Note that pressing Recycle forces every user off the system out, regardless of permissions or current activity.
Red asterisk (*) indicates a required field.
Edit Site Settings
- Select the Admin activity from the Navigation Bar.
- Open the Site Settings page.
General Setting
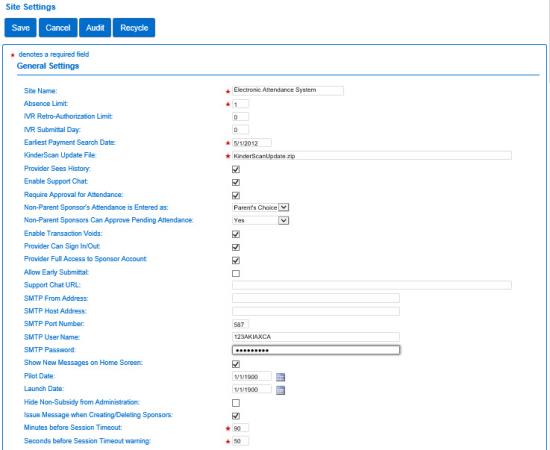
- Site Name - Indicates the name specific to this KinderConnect site which will be displayed in the Login page.
- Absence Limit - Indicates the maximum number of absences allowed during a selected time period before the system issues a flag.
- IVR Retro-Authorization Limit - Indicates the number of days from the actual date that a Provider or Sponsor has left to enter attendance via the IVR (Interactive Voice Response) system.
- IVR Submittal Day - Indicates the number of days after the payment period ends for submitting attendance via the IVR (Interactive Voice Response) system.
- Earliest Payment Search Date - Enter the earliest date the system can go back to when looking for issued payments.
- KinderScan Update File - Enter the location of the most recent update file.
- Provider Sees History - Check this box to grant the Provider access to history records.
- Enable Support Chat - Check this box to allow the Provider to receive support services via Chat.
- Require Approval for Attendance - When selected, it requires that attendance entered by a Sponsor or Provider be approved by the other before submittal.
- Non-Parent Sponsor's Attendance is Entered as - Press the drop-down arrow to select the status of the Attendance entered by a Sponsor that is not a parent.
- Non-Parent Sponsors can Approve Pending Attendance - Press the drop-down arrow to select whether a Sponsor that is not a parent can approve pending attendance.
- Enable Transaction Voids - When selected, the person that created the transaction can also cancel it.
- Provider Can Sign In/Out - When selected, the Provider can enter AttendanceIn and Out times.
- Provider Full Access to Sponsor Account - When selected, it gives the Provider full access to the information on the Sponsor Account.
- Allow Early Submittal - When selected, the Provider can submit Attendance in advance for a period that has not yet ended.
- Support Chat URL - Enter the URL for the Chat site.
- SMTP From Address - Enter the SMTP origin address.
- SMTP Host Address - Indicates the SMTP host address.
- SMTP Port Number - Indicates the SMTP port number.
- SMTP UserName - Indicates your user name to access SMTP.
- SMTP Password - Indicates your password to access SMTP.
- Show New Messages on Home Screen - Check this box to indicate that the Operator will see any new messages on the Home page upon login.
- Pilot Date - Indicates the start date for the pilot test.
- Launch Date - Indicates the start date for entering Attendance or use the Calendar button to select.
- Hide Non-Subsidy from Administration - Check this box to indicate that the Region Administrators and the System Administrators will not be able to see the Non-Subsidized Schedules.
- Issue Message when Creating/Deleting Sponsors - Check this box to indicate that the system will issue a message when an Operator creates or deletes a Sponsor.
- Minutes before Session Timeout - Enter the number of minutes an Operator is allowed remain inactive while logged on before the system closes the session.
- Seconds before Session Timeout Warning - Enter the number of seconds before an Operator receives a warning message before the system closes the session.
Password and Log On Settings
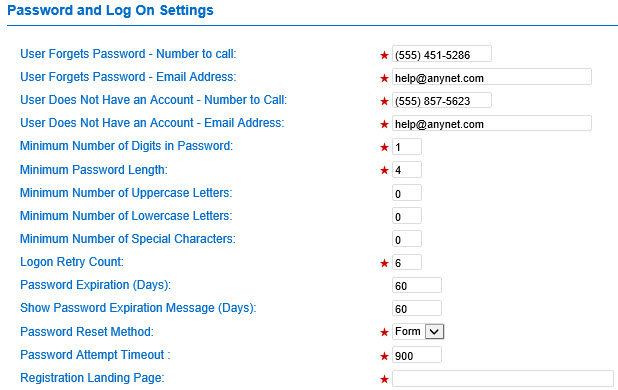
- User Forgets Password - Number to call - Provides a telephone number to call when a user forgets the password.
- User Forget Password - Email Address - Provides an email address to contact when a user forgets the password.
- User does not have an account - Number to call - Provides a telephone number to call when a user does not have an account.
- User does not have an account - Email Address - Provides an email address to contact when a user does not have an account.
- Minimum Number of Digits in Password - Indicates the minimum number of digits required in a password. If the password does not contain a digit or more, it will not be accepted.
- Minimum Password Length - Indicates the minimum number of characters required in a password. If the password does not meet the length requirement, it will not be accepted.
- Minimum Number of Uppercase Letters - Indicates the minimum amount of uppercase letters required in the password.
- Minimum Number of Lower Case Letters - Enter the minimum amount of lowercase letters required in the password.
- Minimum Number of Special Characters - Enter the minimum amount of special characters required in the password.
- Logon Retry Count Enter the maximum number of incorrect login attempts a user can make before being locked out of the system. Once this happens, the user is required to contact Support, allowing an Administrator to verify their identity and unlock the user.
- Password Expiration (Days) - Enter number of days that the password can be used before it expires.
- Show Password Expiration Message (Days) - Enter the number of days prior to the password expiration date that you would like the message to appear.
- Password Reset Method - Press the drop-down arrow and select the method to be used for resetting the password. You can choose to receive an email with instructions or complete an online form verifying identity.
- Password Attempt Timeout - Enter the maximum number of seconds that an operator has when attempting to login based on the Logon Retry Count.
- Registration Landing Page - Enter the URL used to access the site.
Splash Screen Settings
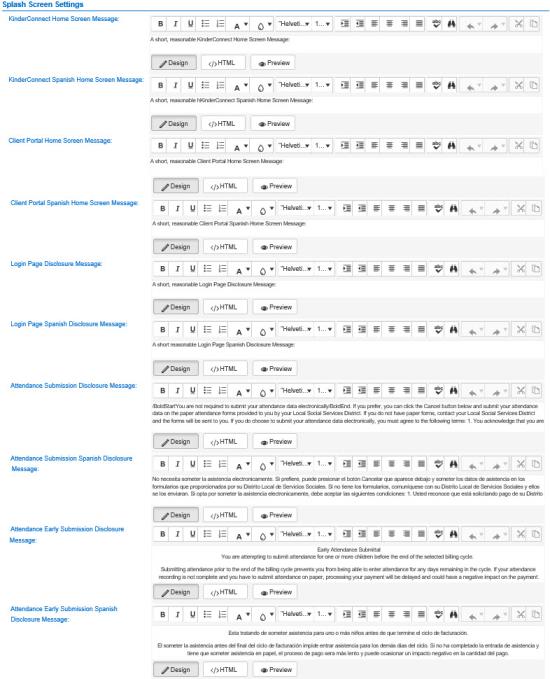
KinderConnect allows for various messages to apply in different pages of the application. Use these fields to enter or modify the message you would like to appear in the Home page, the Login page, or the Attendance Submission page.
Messages on the Client Portal screen are used to provide information to Sponsors.
Register User Settings
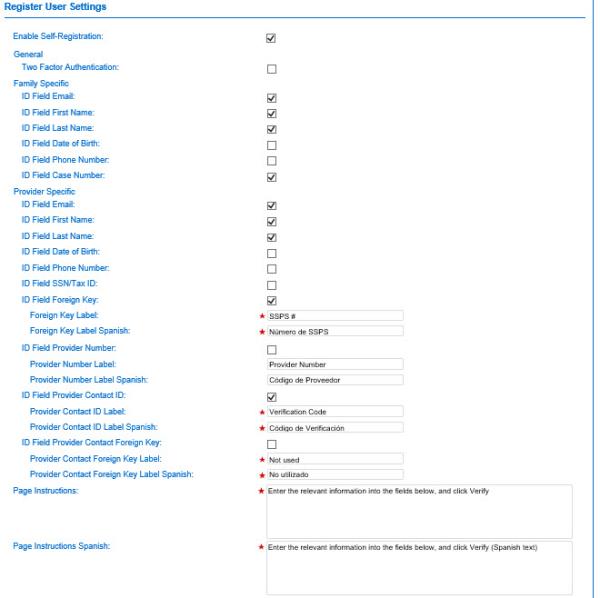
- Enable self-registration - Check this box to enable a user to register within KinderConnect by identifying himself/herself with responses to selected ID Fields.
If checked, the agency can select one or more ID Fields to be used for verification purposes when a user attempts to self-register. The user's response to each selected ID Field must match a record in KinderConnect in order to successfully complete self-registration.
- General
- Two Factor Authentication - Check this box so that KinderConnect sends a confirmation email to the user to complete the registration process.
- Family Specific
- ID Field Email - Check this box to require a user to enter his/her email address to self-register.
- ID Field First Name - Check this box to require a user to enter his/her first name to self-register.
- ID Field Last Name - Check this box to require a user to enter his/her last name to self-register.
- ID Field Date of Birth - Check this box to require a user to enter his/her date of birth to self-register.
- ID Field Phone Number - Check this box to require a user to enter his/her phone number to self-register.
- ID Field Case Number - Check this box to require a user to enter his/her first case number to self-register.
- Provider Specific
- ID Field Email - Check this box to require a user to enter his/her email address to self-register.
- ID Field First Name - Check this box to require a user to enter his/her first name to self-register.
- ID Field Last Name - Check this box to require a user to enter his/her last name to self-register.
- ID Field Date of Birth - Check this box to require a user to enter his/her date of birth to self-register.
- ID Field Phone Number - Check this box to require a user to enter his/her phone number to self-register.
- ID Field SSN/Tax ID - Check this box to require a user to enter his/her social security number or tax ID to self-register.
- ID Field Foreign Key - Check this box to require a user to enter his/her foreign key to self-register. If selected,
- Foreign Key Label - Enter the name that you would like to display to the user identifying any foreign keys used to link the user to another system that interfaces with KinderConnect.
- Foreign Key Label Spanish - Enter the Spanish text that you would like to display to the user identifying any foreign keys used to link the user to another system that interfaces with KinderConnect.
- ID Field Provider Number - Check this box to require a user to enter his/her provider number to self register.
- Provider Number Label - Enter the name that you would like to display to the user indicating the name of this field.
- Provider Number Label Spanish - Enter the Spanish name that you would like to display to the user indicating the name of this field.
- ID Field Provider Contact ID - Check this box to require a user to enter his/her provider contact ID to self-register. If selected,
- Provider Contact ID Label - Enter the text you would like to display to the user indicating the name of the location of the provider contact ID.
- Provider Contact ID Label Spanish - Enter the Spanish text you would like to display to the user indicating the name of the location of the provider contact ID.
- ID Field Provider Contact Foreign Key - Check this box to require a user to enter his/her Provider contact foreign key information. If selected,
- Provider Contact Foreign Key Label - Enter the text you would like to display to the user indicating the name of the provider contact foreign key.
- Provider Contact Foreign Key Label Spanish - Enter the Spanish text you would like to display to the user indicating the name of the provider contact foreign key.
- Page Instructions - Enter any instructions relevant to the user.
- Page Instructions Spanish - Enter any Spanish instructions relevant to the user.
Report Settings
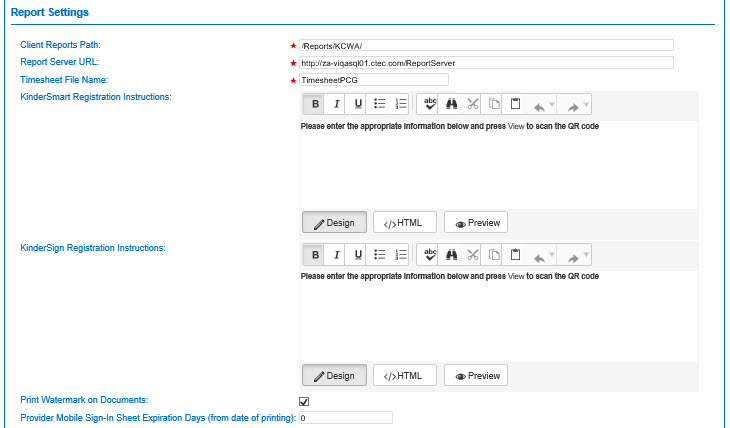
- Client Report Path - Enter the location of the Client Reports.
- Report Server URL - Enter the URL of the server where the Report is located.
- Timesheet File Name - Enter the file name for the Timesheet.
- KinderSmart Registration Instructions - Enter the instructions on how to register that you would like to appear in the KinderSmart Registration Form available through the Sponsor Detail page.
- KinderSign Registration Instructions - Enter the instructions on how to register that you would like to appear in the KinderSign Tablet Registration Form.
- Print Watermark on Documents - Check this box to indicate if you would like to print a watermark on the documents.
- Provider Mobile Sign-In Sheet Expiration Days (from date of printing) - Enter the number of days that a Provider Mobile Sign-In Sheet will remain valid after it is printed.
Payment Settings
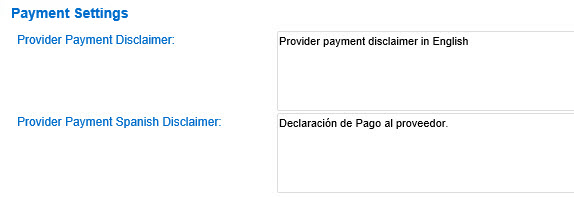
- Provider Payment Disclaimer - Enter any notice text that you would like to display on the Provider > Payments page.
- Provider Payment Spanish Disclaimer - Enter any Spanish notice text that you would like to display on the Provider > Payments page.
Mobile Device Settings
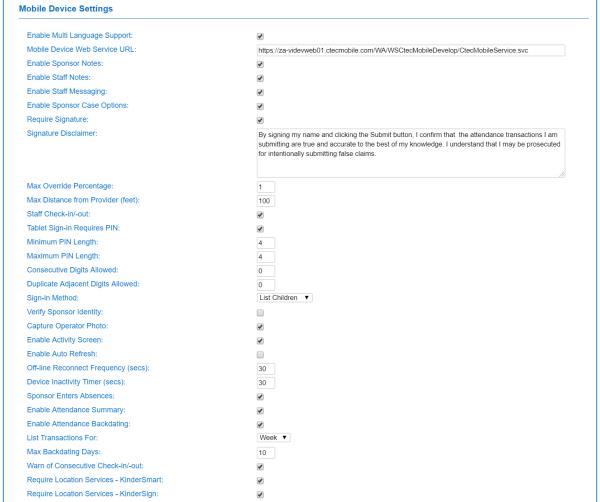
Use these settings to define how the mobile devices will interact with KinderConnect.
- Enable Multi Language Support - Check this box to enable support in various languages.
- Mobile Device Web Service URL - Enter the URL of the web service used for mobile devices.
- Enable Sponsor Notes - Check this box to allow Sponsors to enter notes.
- Enable Staff Notes - Check this box to allow the staff of the Provider to enter notes.
- Enable Staff Messaging - Check this box to allow the staff of the Provider to send messages.
- Enable Sponsor Case Options - Check this box to allow the Sponsor to use case options.
- Require Signature - Check this box to indicate that a signature is required.
- Signature Disclaimer - Enter the disclaimer that Sponsors will need to read and accept prior to signing and submitting.
- Max Override Percentage - Enter the maximum percentage of overrides a Provider can make before being flagged.
- Max Distance from Provider (feet) - Enter the maximum distance from the Provider facilities where a Sponsor can Check-In/Check-Out children.
- Staff Check-In/Out - Check this box if the system allows employees of Provider to use KinderConnect to keep track of their attendance.
- Tablet Sign-In Requires PIN - Check this box if the system requires the users to enter a Personal Identification Number (PIN) to access the tablet.
- Minimum PIN Length - Enter the minimum number of characters required when creating a PIN.
- Maximum PIN Length- Enter the maximum number of characters allowed when creating a PIN.
- Consecutive Digits Allowed - Enter how many consecutive numbers the system allows in the PIN.
- Duplicate Adjacent Digits Allowed - Enter how many of the same number the system allows next to each other in the PIN.
- Sign-In Method - Press the drop-down arrow to select the signature type to access KinderSign, if it is based on list of Sponsors assigned to the child, list of children assigned to the Sponsor, or the telephone number.
- Verify Sponsor Identity - Check this box to require that a Provider staff member enters his/her PIN to verify identity before allowing a Sponsor to set up the secret question/answer/PIN during the security setup.
- Capture Operator Photo - Check this box if the system requires a photo as proof of attendance.
- Enable Activity Screen - Check this box to enable a screen on KinderSign that broadens Sponsor activities beyond attendance entry to include messaging, case information viewing, and other features.
- Enable Auto Refresh - Check this box to enable the data to update automatically.
- Off-Line Reconnect Frequency (secs) - Enter how often (in seconds) KinderSign attempts to reconnect to the network when it is off-line.
- Device Inactivity Timer (secs) - Enter how long (in seconds) an activity in KinderSign can be inactive before returning to the sign in page.
- Sponsor Enters Absences - Check this box to indicate if a Sponsor cannot enter a child's absence.
- Enable Attendance Summary - Check this box to allow Providers to view a summary of the children currently checked In or Out.
- Enable Attendance Backdating - Check this box to allow Providers to backdate attendance entries.
- List Transactions For - Press the drop-down arrow to select the period (day, week, or month) to be displayed.
- Max Backdating Days - Enter the maximum number of days in the past that attendance can be entered.
- Warn of Consecutive Check-In/Out - Check this box if the system should issue a warning when multiple check-ins or check-outs occur in a row.
- Require Location Services - KinderSmart - Check this box to require that, when using KinderSmart, the locating method of the tablet allows the GPS and Wi-Fi to show the actual location of the Sponsor when doing check-in or check-out of the children.
- Require Location Services - KinderSign - Check this box to require that, when using KinderSign, the locating method of the tablet allows the GPS and Wi-Fi to show the actual location of the Sponsor when doing check-in or check-out of the children.